So, when I started the TV at home with a program fed into HDMI, I got this:
Wow, this may go as modern art, but it's far from a good image :-)
Something on the main board is going very wrong, I thought. A TCON board cannot produce such images. There were no errors in the scanning. Everything was at its intended place on the screen, but the colors were all wrong and there was noise inside the shapes, especially where white areas were supposed to be.
Zooming into the image; interesting block structures:
The menu at close-up. The entries were still readable, so I was able to at least control the TV.
The image supplied by my Nexus 7 looked nowhere near the original:
Software Update Woes
At a couple of places I read that re-initializing the TV with a software update could sometimes straighten weird image distortions. So, I downloaded the latest firmware and put it on a USB stick, which I formatted with FAT (not FAT32) as required by Toshiba.
The TV just wouldn't accept the data on the USB stick, even though the media player was able to navigate into it. I browsed through a number of forums and one guy recommended to format the stick with HP USB Disk Storage Format Tool. I mean, really? Well, I tried that and it worked! No comment...
Alas, the update did not fix it.
Getting On
Even though I immediately suspected the main board, I started my standard routine checks.
First, the power supply. Nothing caught my eye there and the caps measured all ok. Only top quality caps. Well done, Toshiba:
The 12V line measured a little low (11,7V) and was pretty noisy:
Well, that must have been the noisiest power supply I have seen so far, but it looked ok, nevertheless. All the regulated supplies on the main board were low noise and the voltages made sense.
Just when I looked up (and found) a replacement main board in my preferred sources, I remembered a repair story in Kent Liew's LCD TV Repair Tips 4.0, where he fixed a similar-looking problem by re-configuring a device via the service menu. It wasn't a Toshiba though, but I gave it a shot. The service manual is available from elektrotanya.com.
Among other things, the service manual describes how to configure the main board properly for the given TV type and panel type:
To switch the Toshiba into service mode, you do the following:
- Press and release the mute button on the remote twice
- Press and hold the mute button on the remote
- Press the Menu button on the TV
All that in quick succession. A red S appears at the top right corner. In the left corner, the individual config settings are shown, which can be paged with the Program Up/Down buttons and modified with the Volume +/- buttons on the remote.
The SETID specifies the TV model. It was way off and complete nonsense! I set it to 11hex according to the model table:
Same thing with the panel ID. It was set to 65hex, which belongs to the 32 inch model with a Samsung panel. Mine is a 37inch with an LG panel!
After that, you press the "Info" button on the remote and the "Program Up" on the TV at the same time. The TV reconfigures itself and reboots.
Tadaaaa! The image was back!
Actually, I had to repeat the process because the IDs were wrong again. Not so bad as the first time, just off by 1. Why? I don't know.
How does that finding fit the description I got from the seller? Normally, I would conclude that someone who had no clue what he was doing swapped the main board with a used one from eBay or so, and got stuck. However, the TV looked untouched. Anyway, it was a cheap and quick repair!
About Toshiba Service Mauals
The manual I've downloaded from elektrotanya comes in a strange format. It consists of a large number of HTML files, images, and DWF files. Opening the start HTML page will complain "The ZEUS engine cannot be located". The manuals require the installation of the ZEUS engine, which is also avaliable as a RAR from elektrotanya. This software is very old (2007) and consist of JavaScript files of the most peculiar kind. The installer says that IE6(!) or higher is required. I couldn't get the thing to run on my W7 64Bit machine with chrome. Bummer!
Some HTML pages may work nevertheless. The setup I've described is located in !adj-sm.html, for example.
Now, what are those DWF files? They are Autodesk project files and contain the schematics and board layouts. Nice! You need to download the free reader program Autodesk Design Review.
When you open a file, you will see nothing. It took me a while to grasp the program. First, the WHITE_MASK in the Layers list must be switched off:
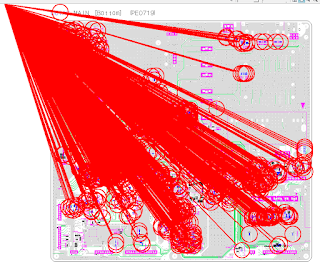
After that, you'll see something like this:
The red thingies are layers for each(!) individual component to indicate its location. That is enormously useful with complex boards like the main board:
But I cannot tell the wood from the trees anymore! Well, you need to switch off all the component layers and then you can zoom into the details as much as you like. To locate a component, just switch its layer on.
This is pretty darn good! I spent so much time searching for components in the vector graphics of the Philips manuals.
The layers which reveal the complete drawing are called:
- 0
- BLACK
- GRAY
- HOLE
- MAGENTA
Unfortunately, some of them are right in between the components in the layer list, so it is a little tedious.


No comments:
Post a Comment
Note: Only a member of this blog may post a comment.